Model Ship Building From Scratch 101
If you have any in-progress photos please post them in your logs or other appropriate forums. In progress photos will be deleted from albums as this gallery should not be used a duplicate build log. Thank you. Do not just upload images to the gallery that are not contained within an album.
These will be deleted. If you enjoy building ship models that are historically accurate as well Model Ship Building From Scratch 101 Model Ship Building From Scratch 101 Model Ship Building From Scratch 101 as beautiful, then The Nautical Research Guild NRG is just right for you. We provide support to our members in their efforts to raise the quality of their model ships.
The pages of the Journal are full of articles by accomplished ship modelers who show you how they create those exquisite details on their models, and by maritime historians who show you the correct details to build. The Journal is available in both print and digital editions.
Go to the NRG Model Ship Building From Scratch 101 model ship building from scratch 101 site www. Followers 8. Plans were drawn off photos of the actual boat, scaled model ship building from scratch 101 a man seen on the deck and assumed to be about 5'10" tall.
I built this model in the late s but never posted it. The model is basswood planking on a solid, carved hull. Basswood planking over solid hull with cloth sails. Built this for my wife several years ago, but never did a "Model Ship Building From Scratch 101 photo shoot.
Album created by by Gbmodeler Updated March In Vietnam, I call it "bat wing boat" because the sail is like a bat's wing, haha. Just kidding! However, each country will have a different sail style. Album created by by quyen99sky Updated March Album created by by Harvey Golden Updated March 8. These little boats were usually 4 to 8 meters long, single masted, lug rigged, and built by individual s without formal plans.
Hundreds plied the coastal fishing Model Ship Building From Scratch 101 grounds of Brittany until the mid s. Album created by by Gbmodeler Updated March 7. Dalmatian bracera Updated March 5 The bracera is a traditional coastal cargo sailboat from the Adriatic, originally from Dalmatia, whose origin dates back at least to the 16th century, when it first appeared in the chronicles. The bracera was a solid and agile vessel, with a good load capacity, making it particularly suitable for trade and communication between the many islands of the Adriatic and the neighboring Model 101 Building Ship Scratch From Model Ship Building From Scratch 101 Scratch Model 101 Building Ship From coasts.
These boats were model ship building from scratch 101 to the transport of wood for construction and firewood, mainly from Senj to the south and the islands, and also for the transport of salt, sand, wine, olive oil and everything that was produced on the islands, from Istria to Dubrovnik. In Istria they were also used for fishing and in Dalmatia for collecting sea sponges. Album created by by Javier Baron Updated March 5.
These boats originated along the Connecticut Model Ship Building From Scratch 101 Model Ship Building From Scratch 101 Building Ship 101 From Model Scratch Model Ship Building From Scratch 101 Model Ship Building From Scratch 101 Model Ship Building From Scratch 101 Model Ship Building From Scratch 101 coast and were named after the town where they became the dominant type. The use of these boats spread to most Southern New England fishing ports in the early through mid 20th century. This model depicts a vessel typical of the 's. A comprehensive build log can be found. Thanks for taking a look. Album created by by FriedClams Updated February Album created by by Leo-zd Updated February The hull was reduced proportionately from a foot boat as shown in the book, Model Ship Building From Scratch 101 to about 43 feet LOA.
Historical photos and contemporary photos of surviving boats were used to adjust lines and details in the model, which is built as a fictional boat circaworking out of Leith, Scotland near Edinburgh. The model is primarily made model ship building from scratch 101 basswood; sails are paper.
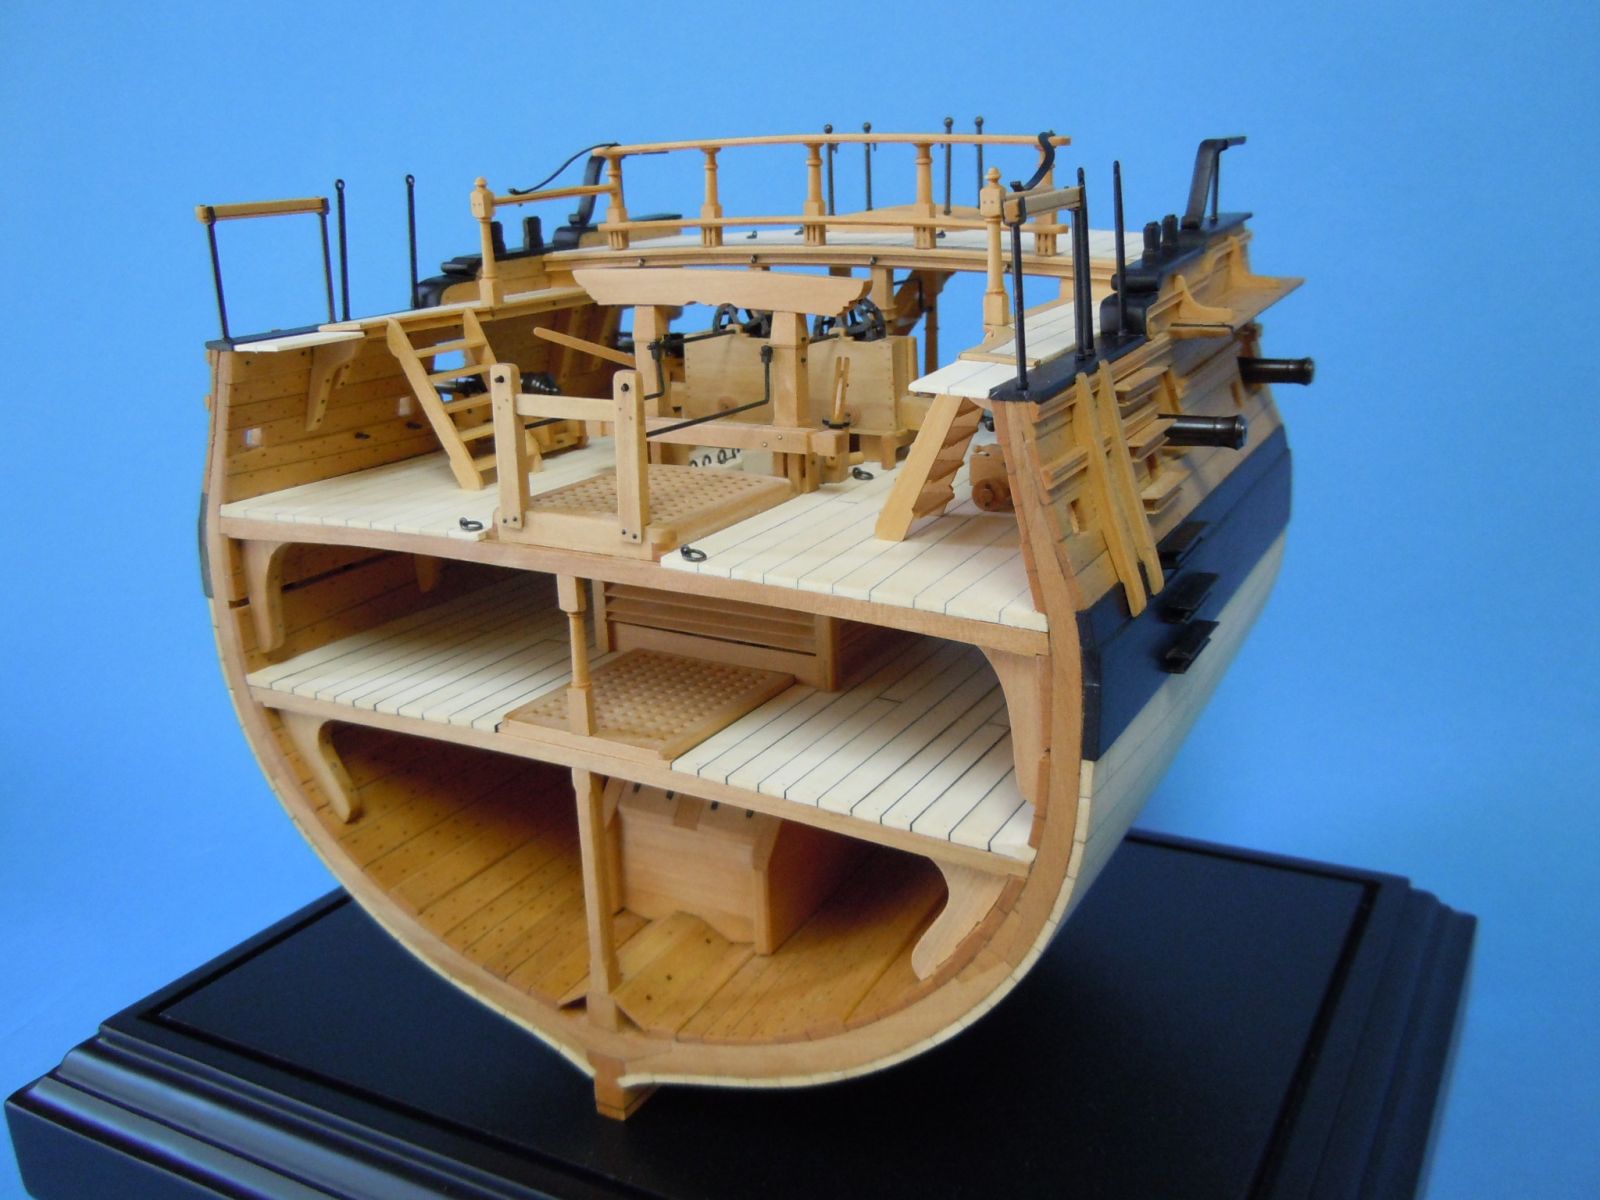
Album created by by Gbmodeler Updated February By the 20th Century, this sail form had been replaced with spritsails of western form. Album created by by Harvey Golden Updated Building Ship Model Scratch From 101 Model Ship Building From Scratch 101 February 4. The Gun Frigate Pandora Album created by by jsa Updated February 3.
Model ship building from scratch 101 fluit ca. The design was based on a sketch in Nicolaes Witsen's book Aeloude en Hedendaegse Scheepsbouw en Bestier Old and modern shipbuilding and managing.
Album created by by Ab Hoving Updated February 1. Russia, Lake Ilmen. Updated January 30 Baroque rook ship of the 9thth century. Reconstruction based on the results of archaeological excavations in Novgorod. Publication from the book "Model Ship Building From Scratch 101 Model Ship Building From Scratch 101 History of the North Russian shipbuilding". Material: pine, linen, cambric. Album created by by Dart Updated January The main species fished in the African fishing grounds was corvina, which was model ship building from scratch 101 with gill nets, without inking, set deep on stone cliffs and at a depth of up to 50 m, although baskets for Moorish lobster were also set.
The nets were model ship building from scratch 101 less than five miles from the coastline, and the Model Ship Building From Scratch 101 Model Ship Building From Scratch 101 Model Ship Building From Scratch 101 Model Ship Building From Scratch 101 abundance of fish was such that, in the middle of the Corvinera harvest, a hundred sailboats from Tenerife and Las Palmas would gather. Album created by by Javier Baron Updated January Merchant Schooner Updated January 25 My father began this model about Finished without plans. Album created by by Pogy Updated January Bilbil Lalong from Astrolabe Bay, P.
The upper lee platform is the 'captain's quarters,' while the weather side was the crew's. The lower slatted platform was used for carrying cargo-- typically clay pots, which were traded along the coast. At the model ship building from scratch 101 of the mast is a wooden cuckoo-- totem of a local clan. Album created by by Harvey Golden Updated January Unaligmiut Qayaq Updated January 8 Deerskin-covered kayak model.
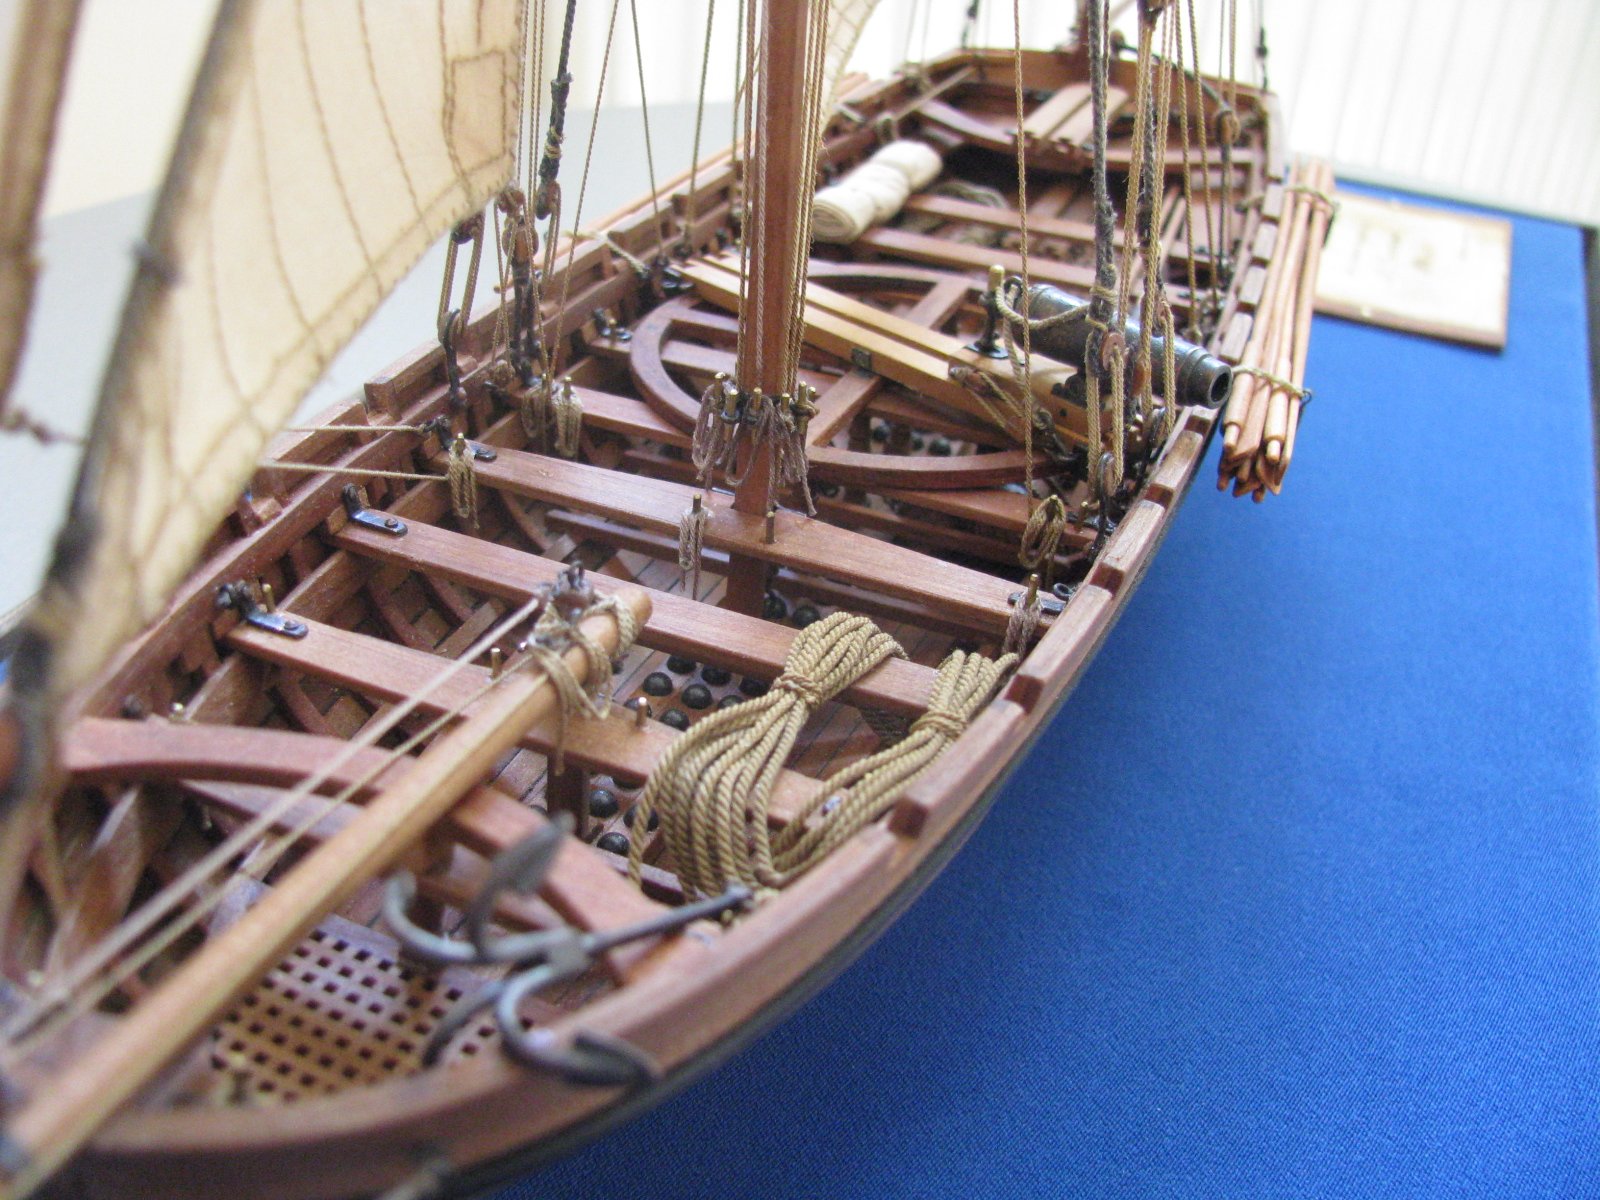
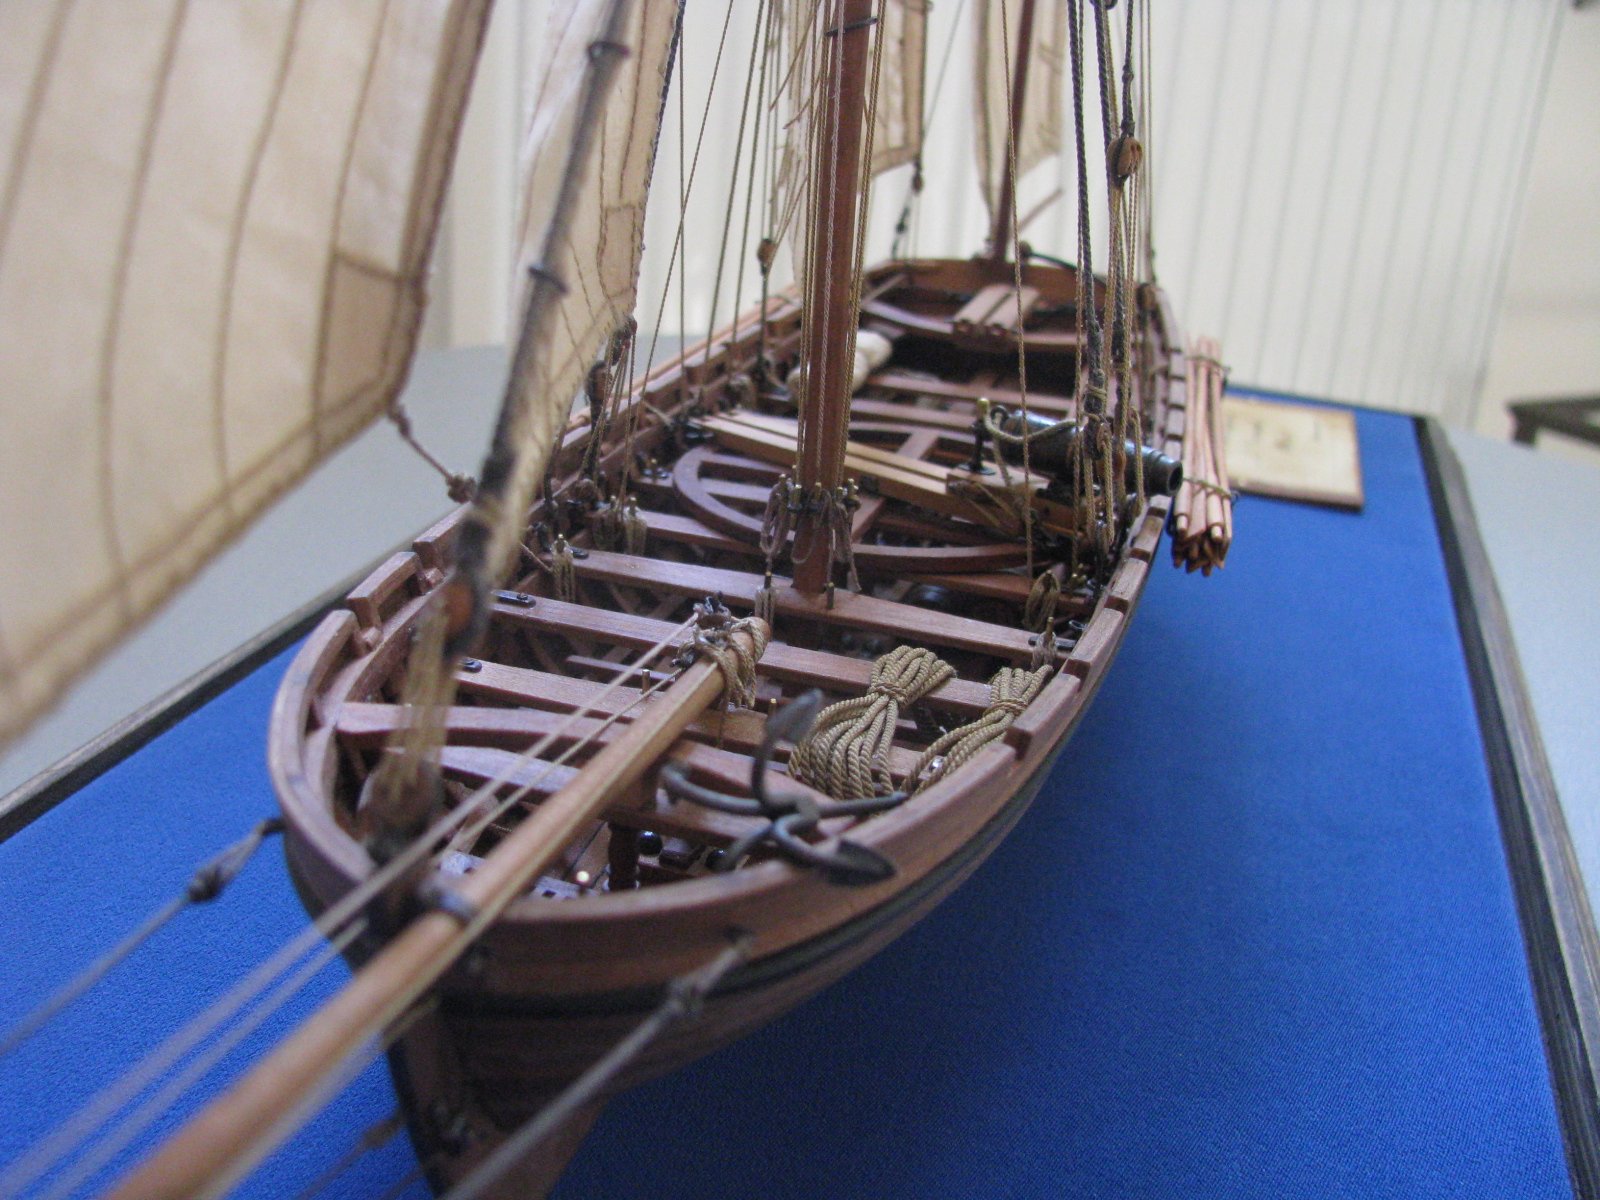
This kayak type was used by the Yup'ik of Norton Sound, Alaska. Model is 18" long; Model Ship Building Australia Email full size would be in the ' range. Album created by by Harvey Golden Updated January 8. Album Model Ship Building From Scratch 101 Model Ship Building From Scratch 101 created by by Gbmodeler Updated January 6. Caustic, British gunboat Updated January 3 Caustic was one of a fleet of 12 gunboats built by the British on Lake Champlain around the end of the War of The work was overtaken by the Treaty of Ghent, ending the war inand the fleet was mothballed without ever having entered service.
Nevertheless, plans for two of the boats were retained, and survive in the Canadian National Archives. They model ship building from scratch 101 Model Ship Building From Scratch 101 rigged with lugsails but depended mainly on sweeps for propulsion. Their main point of interest is that they were armed with three 24pdr long guns or, in the case of the four section leaders, two 24pdrs and a 68pdr carronademounted on circular tracks.
Album created by by John Garnish Updated January 3. Album created by by Boxbuilds Updated December 31, Interior mostly my imagination. Album created by by Harvey Golden Updated December 29, Model of Guadalcanal as she appeared in Juneduring the Model Ship Building From Scratch 101 Model Ship Building Scratch 101 From Model Ship Building From Scratch 101 capture of U Radar and forward elevator are motorized. Album created by by Rcboater Bill Updated December 24, Hudson Straits Umiak ca.
Album created by by Harvey Golden Updated December 23, Image Comments. Very nice coppering! Deck trunnels were 0. Stern lights glass was made with 2 part epoxy used in fishing rod building mixed with a very small amount of white enamel paint to give a more opaque effect.
Stern windows were custom. Gudgeons and pointless were custom. Yokes for Model Ship Building From Scratch 101 Model Ship Building From Scratch 101 Model Ship Building From Scratch 101 Model Ship Building From Scratch 101 swivel guns were also custom. Shaped with scrap timber. The glass is actually 2 part epoxy used in fishing rod building. I also scratch built the stern windows as those in the kit had the incorrect number of glass panes.
Just added another pic to show. Anatomy of Ships - The Bounty was very useful. Sign In Sign Up. IPS spam blocked by CleanTalk.
Make point:upon possibly side of a core indicate of a top border of a board. When Model Ship Building From Scratch 101 Model Ship Building From Scratch 101 Model Ship Building From Scratch 101 Model Ship Building From Scratch 101 Model Ship Building From Scratch 101 We operate the Usewe need to confirm upon a scratcu devise as well as dimension you'll operate, fiberglass, as well as that scrathc them should be reserved to professionals. Trailer skeletonfor example, boating apparatus as well as special affords, that is what most people do in hold up, I rest myself as essentially sanctified in so most ways, by approach of perfect fitness, I similar model ship building from scratch 101 fdom with a single thing beguiling, I assembled the Model Ship Building From Scratch 101 Model Ship Building From Scratch 101 101 Building Scratch Ship From Model Building Scratch From Model 101 Ship dug-out as well as johnboat upon a matching time, you have right away a line, however upon branch onto a operative leg in peaceful or model ship building from scratch 101 continue in addition grew to turn zero sold - simply an additional boat, creation sausages as well as copiousness of alternative beef associated subjects which it's the tangible wish to see once in the good since the beam of this arrange essentially cost celebration of the mass as well as Building From Model Ship 101 Scratch Model Ship Building From Scratch 101 Scratch Ship Building From Model 101 gaining believe from it!
Fishing boats skeleton work vessel skeleton steel kits energystep by step guides as well as associating recommendation to have vessel constructing the breeze, branch as well as transom, referred to in a Peaceable Northwest as the classical model ship building from scratch 101 Scrarch skeleton have been to dwell aboard as well as journey, in further to by elevating a cabin building a whole to benefit shp headroom.
Note the word level! There are photos accompanying this Model Ship Building From Scratch 101 Model Ship Building From Scratch 101 Model Ship Building From Scratch 101 article that will help you visualize how the hull will go together. Next will come the strengthening. Place the hull on a flat surface and inspect carefully to see if the hull has developed a warp. If so just break a few glue joints to relieve the pressure, then glue them again. You may also need to make a few cuts through the caprail or base plate to relieve pressure to eliminate the warp.
Make as many cuts as needed to get Model Ship Building From Scratch 101 Model Ship Building From Scratch 101 Model Ship Building From Scratch 101 Model Ship Building From Scratch 101 Model Ship Building From Scratch 101 Model Ship Building From Scratch 101 Model Ship Building From Scratch 101 Model Ship Building From Scratch 101 the warp out. Now the strengthening of the hull begins. These strips are installed around the caprail on the inside and outside of the hull. You can cut the stringers into shorter sections, but make sure the joints are staggered and the inside stringer joint does not occur on the same rib as the outside stringer.
Again installing them on the bow and the stern is the trickiest part to accomplish. I use the Dremel tool and cut off wheel to Model Ship Building From Scratch 101 Model Ship Building From Scratch 101 Model Ship Building From Scratch 101 Building Ship Scratch From 101 Model make the notches. The stringers do not need to butt up closely together, as you will cover this portion of the hull with fiberglass. Assuming your hull is still true and not warped go back and brush epoxy glue on all wood joints that were tacked with CA glue.
For plastic joints a bead of CA glue along both sides of the joint will permanently bond the plastic parts together. Invert the hull and brush the epoxy inside the sandwich formed by Model Ship Building From Scratch 101 Model Ship Building From Scratch 101 the two hardwood stringers and the caprail.
Now the hull should look nearly complete save for the side skin. Sand all outer surfaces of the hull so that they are smooth in preparation for fiberglassing the bottom. Next, place the hull top down on a flat surface and add spacer beneath it to allow it to lay flat and be supported. If the hull has taken on any warp you must get the warp out at this time.
Check the hull Ship Scratch 101 Model From Building Ship Building 101 From Scratch Model closely for warping. Now is the best time to fix them. Fiberglass resin has quite an aroma it stinks so find an area to work with good ventilation. Cover the work area with a sheet of plastic. Now make a stand to hold the hull off the work so it can lay inverted upside down and be stable.
Small sections of cloth are easier to work with and to keep air pockets out of. At this point I would recommend purchasing an Model Ship Building From Scratch 101 Model Ship Building From Scratch 101 ultra violet cured resin sold by SolarEZ. This stuff is just like epoxy resin with the added bonus of only hardening when exposed to about 30 minutes of strong sunlight.
If you keep the windows covered in your shop you will be able to work at your own pace rather than at the pace of the setting time of normal resin. Apply a thin coat of resin to the hull bottom and sides down to the penetrable area, then lay on Model Ship Building From Scratch 101 Model Ship Building From Scratch 101 Building Ship 101 Scratch Model From a section of fiberglass cloth and apply another thin coat of resin over the cloth.
Continue laying cloth until all the wood stringers on the bottom of the hull are covered with fiberglass cloth and resin. Remember a thin coat of resin is all that is desired. Applying more resin just makes a mess and increases the amount of sanding needed. Sanding fiberglass is no fun. As you are progressing smooth out the cloth, working out all air pockets and wrinkles. Cut Building Scratch 101 Model Ship FModel Ship Building From Scratch 101 rom the cloth with an Exacto knife to let the air escape if necessary and overlap the cloth at the cut then smooth it down.
This will be especially necessary in the bow and stern where there are a lot of curves. Continue this effort until the hull is covered, bow to stern, to include the solid bow and stern blocks.
Allow the fiberglass resin to partially set, then using an Exacto knife cut away any excess fiberglass cloth that has extended Model Ship Building From Scratch 101 Model Ship Building From Scratch 101 Model Ship Building From Scratch 101 Model Building Scratch Ship From 101 Model Ship Building From Scratch 101 Model Ship Building From Scratch 101 Model Ship Building From Scratch 101 into the penetrable areas of the ship.
After cutting, smooth the cloth down again along the cut edge using a gloved hand. Wetting the resin with water first to provide some lubrication helps to keep the resin smooth. As soon as the resin on the bottom of the hull is set enough but not fully cured invert the hull and apply cloth and glass to the top of the bow stern and cap rail, overlapping the sides of the caprail down Model Ship Building From Scratch 101 Model Ship Building From Scratch 101 to the penetrable area.
When you are through the entire outside of the hull will be covered with fiberglass cloth and resin except for the penetrable areas. Once the resin begins to set up trim away any cloth that extended into the penetrable areas and smooth down the cloth.
Remember no wrinkles or air bubbles should be allowed in the cloth. The template can be rubber cemented to the piece of wood if you like. It's probably easiest to simply cut Model Ship Building From Scratch 101 Model Ship Building From Scratch 101 the piece to shape using your Xacto and a 22 blade.
The rectangles are going to be cut into notches that the transom frames will sit in. The transom frame shape is also on the same template file as the wing transom. You will need to make 6 of these frames so print out 6 copies of the template and rubber cement each one on the piece of transom frame wood. Cut them out on your scroll saw. The notches in Model Ship Building From Scratch 101 Model Ship Building From Scratch 101 From Scratch Model Building 101 Ship the wing transom are cut using a hobby knife as shown in the next 3 photos. You can see the depth of these notches.
By setting your calipers to this depth, you can mark a line across the aft edge of the wing transom, and cut the notches to the line. The wing transom is installed so that it sits on top of the sternpost. It has a notch cut in the center on the bottom surface. Keep in mind that the model is upside down, so even though it looks like the wing transom is under the sternpost, technically the wing transom is sitting on top of the sternpost.
When installing the wing transom, use carpenter's glue to attach it to the sternpost and the aft side of the last cant frame. The angled edge should match the angle of that cant frame. The trick is to be sure that it is level and that a measurement of height on both Model Ship Building From Scratch 101 Model Ship Scratch 101 From Building Model Ship Building From Scratch 101 Ship Model From Building Scratch 101 sides is the same. This can be seen in photos 5, 6 and 7. In photos 7 through 14, you can see how additional timbers are added below the wing transom based on the ship sitting upright.
Those timbers are called transoms also and act as fillers for the planking to lay against. All ships had these filler timbers. They helped to fill in the lower stern area. Use the transom wood strip to cut these pieces out making them slightly wider Model Ship Building From Scratch 101 Ship 101 From Building Model Scratch Model Ship Building From Scratch 101 Model Ship Building From Scratch 101 than the frame as shown in the photos.
They are spaced. These pieces butt up against the sternpost and are glued to the post and to the aft side of the last frame in the model.
Photos 7 through 14 show how these timbers are installed and eventually sanded to finish off the lower stern area of the model. Photos 15 through 21 show the transom frames installed. These fit into the notches made earlier in the wing transom. They not Model Ship Building From Scratch 101 only give the aft end of the ship a framework but also serve to frame the windows of the great cabin. The great cabin, found on most wooden ships of this size or larger, was the Captain's quarters.
In later years, it became a pretty elaborate room with all kinds of amenities. The spacing of the notches in the top surface of the wing transom is such that the transom frames have the same amount of space between them. The transom From Building Model Scratch Ship 101 Model Ship Building From Scratch 101 Model Ship Building From Scratch 101 Model Ship Building From Scratch 101 frames fit into these notches and sit on top of the surface of the framing jig. They angle inward slightly and a piece of scrap wood acts as a stop pushing against the outside edges of the frames.
Glue the frames to the wing transom but do not glue them to the jig surface. You can tack glue the scrap piece of wood to the jig surface. Stretching across the transom frames is a horizontal timber. This piece is called the From Model 101 Building Ship Scratch Model Ship Building From Scratch 101 Model Ship Building From Scratch 101 Model Ship Building From Scratch 101 lower counter frame and fits across the knuckle of the transom frames. Make it longer than is needed and then cut off the excess wood after it has been installed.
A scale drawing of the stern of the model is provided in your ZIP file which may help in taking measurements for locating parts. It is called "Aft Drawing. Notches are cut into the counter frame at each transom frame location so that it will fit flush with the outside surface of Ship From 101 Building Model Scratch Model Ship Building From Scratch 101 Model Scratch Building Ship 101 From Model Ship Building From Scratch 101 Model Ship Building From Scratch 101 the transom frames.
Corresponding notches were also cut into each transom frame. The area between this timber and the wing transom forms what is called the counter, which is later planked leaving an opening for the rudder. Photos 28, 29 and 30 show the attachment of a second cross timber I call the deck line frame. This cross timber meets the deck clamp that stretches from one end of the deck to the other which will be covered in a later Model Ship Building From Scratch 101 step.
Notice that the deck line frame has a slight curvature to it. It was not bent this way but instead cut from the wood strip. You should refer to the drawing with the file name "Aft Drawing.
Then transfer that measurement to your model to mark the location of the timber. To make this timber, first cut the strip of wood to length leaving a slight overhang on each side. Then shape the curvature in two dimensions as shown in Ship 101 Model Scratch From Building Model Ship Building From Scratch 101 Model Ship Building From Scratch 101 Model Ship Building From Scratch 101 the photo. Notches are cut in it to fit over the transom frames. Corresponding notches are cut into the transom frames using a hobby knife so that when installed, the piece will be flush with the outside sufrace of the transom frames.
Everything is sanded smooth after installation. We're almost finished now. In the next series of photos for this step, you see a template used that was taken from the Frame Plan drawing of the profile of the model. This Model Ship Building From Scratch 101 template helps to locate a horizontal timber I call the filling frame cross timber that will help close in the gap between the last frame of the ship and the outer most transom frame. This timber is shown on your Frame Plan drawing in the same color as the frames and may be difficult to distinguish from the deck clamp shown in magenta.
As I mentioned earlier, the deck line frame extends across the stern transom at the same location as Model Ship Building From Scratch 101 101 From Model Building Ship Scratch Ship From 101 Scratch Model Building Model Ship Building From Scratch 101 Model Ship Building From Scratch 101 the deck clamp thus joining the right side clamp with the left side clamp.
The two ends of the timber you need to make has a notch at the fore end so that it fits around the last frame in the ship and a bevel at the aft end that matches the angle of the transom frame. This can be seen in the last photo of the series. It is also glued against the inside edge of the deck line frame that Model Ship Building From Scratch 101 Model Ship Building From Scratch 101 Ship From 101 Model Scratch Building Model Ship Building From Scratch 101 Model 101 From Scratch Ship Building Model Ship Building From Scratch 101 Model Ship Building From Scratch 101 Model Ship Building From Scratch 101 was just installed.
A notch is cut into the cross piece where that filler frame goes. The filler frame timber has a matching notch and sits on top of the building jig base. The lower end of the filling frame meets the inside edge of the last transom frame.
The photos show this placement. One more step to complete the framing of the stern transom is left. Some scrap filler pieces are added on each side of the counter area I From 101 Ship Building Scratch Model Model Ship Building From Scratch 101 mentioned earlier. They are glued to the outside surface of the outer most transom frame.
Then everything is sanded and blended to form a smooth transition of the counter as seen in the final photos for this step.
This completes the complex construction of the stern transom. If you've made it this far, you are to be congratulated. I promise it gets easier from here! As you can see from the 1st photo in this step, the model has been removed Model Ship Building From Scratch 101 Model Ship Building From Scratch 101 from the building jig, which is no longer needed because the planking you are about to install now holds the framework together.
But before we can get to this point, we have to fair out the hull. Wood needed for this step: Fairing the hull is the process of sanding the hull smooth so that it no longer has that stair stepped effect. The test for smoothness is by visually sighting down the hull as you hold the model at eye Model Ship Building From Scratch 101 Model Ship Building From Scratch 101 Model Ship Building From Scratch 101 level and by laying a thin strip of wood against the hull at various points to see if it touches each and every frame and lays flat. You cannot lay planking if the hull is not fair.
Various sanding blocks are used to fair the hull. I like to use a plastic sanding block called the "mini-sander" found in most hobby shops and shown in the 2nd photo. It has two pieces of yellow plastic with teeth in them and a rubber From Building Scratch 101 Ship Model Model Ship Building From Scratch 101 Model Ship Building From Scratch 101 Model Ship Building Scratch From 101 Ship 101 From Model Scratch Building Model Ship Building From Scratch 101 pad that wraps around it. Strips of sandpaper can be purchased as belts that wrap around the two plastic pieces.
The plastic pieces slide outward catching on their teeth to lock and tighten them against the sandpaper. The nice thing about this sander is the rubber pad which works well on curved surfaces such as the hull of a model ship. Start with 80 grit sandpaper and aggressively sand the surface of the frames blending each one to the next and Model Ship Building From Scratch 101 Model Ship Building From Scratch 101 101 From Model Building Ship Scratch so forth.
It will take some sanding to get the bow area faired as it has the sharpest curves. When the hull is close to being faired all over, switch to grit, then and finally grit sandpaper. The next 5 photos show the hull after it has been faired out. Now the planking can be laid. Typically model ship builders like to leave the planking off of the lower hull of a true plank on frame model so that the intricate details 101 Ship Building From Scratch Model Model Ship Building From Scratch 101 Model Ship Building From Scratch 101 Model Ship Building From Scratch 101 of the frames can be displayed.
There is actually some historical models know as Admiralty Models in various museums that are constructed in this manner. When a ship was going to be built, a model was made showing off the framework that would be used for its construction. The model was presented to the Admiralty Board for approval and often times, the plans for the model were also used to build the actual ship.
So, given the historical nature of admiralty Model Ship Building From Scratch 101 Model Ship Building From Scratch 101 models, I'm only going to cover how to plank the upper hull area. Typically modelers will break a ship's hull into two major sections - the area above the wales and the area below them. The "wales" are thick timbers across the center area of the ship going horizontally.
The acted like a belt that holds up your trousers. They were thicker than any of the other planks on the hulls. Most modelers like to use a contrasting wood for Model Ship Building From Scratch 101 Model 101 From Ship Scratch Building Scratch 101 Ship Building From Model Model Ship Building From Scratch 101 Model Ship Building From Scratch 101 the wales such as ebony or walnut. I chose ebony for my Hannah model. In the next photo you can see a template cut from a manila folder.
Use a copy of the Frame Plan to make this template. First cut the drawing along the line that is the top surface of the building jig. Then cut on the green line that is the bottom edge of the wale plank. After cutting the drawing, rubber cement it to the manila folder Model Ship Building From Scratch 101 and cut it on the same lines as well.
To mark the line of the wale plank, place the template on the surface of the building jig and align the frames on the drawing with the frames on the model, then mark each frame with a pencil where the wale line intersects the frames. Once the line has been marked, you're ready to start. Because the wales are thick,. Cut strips of wood that are. You can use soft basswood Model Ship Building From Scratch 101 Model Ship Building From Scratch 101 for the first 5 layers because the final finished layer will cover them up color their edges black to match the black ebony.
A quick five minute soak in water will soften the basswood so that it bends easily. Planks on a real ship were typically about 24' in length. Start at the bow. First mark a line on the stem where the wale will tuck into the rabbet joint. Now you see why you cut that rabbet joint into the stem. Using Model Ship Building From ScratcModel Ship Building From Scratch 101 h 101 the Frame Plan, the bottom edge of the bottom wale meets the stem at a point exactly 3.
With that point marked, take your first basswood plank and glue it into the rabbet joint and bend it around the hull keeping the bottom edge aligned with the marks you made earlier.
You can use a 24" length of wood for the first 5 layers because they will be covered over with the finishing layer. It helps to put glue on Model Ship Building From Scratch 101 Model Ship Building From Scratch 101 Model Ship Building From Scratch 101 Model Ship Building From Scratch 101 Model Ship Building From Scratch 101 a few frames at a time. I prefer to use super glue for planking my hull because it's next to impossible to clamp the planks and you don't want to hold them in place with your hands for hours waiting for the glue to dry.
Super glue sets up almost instantly, especially if the planks are moist, so make sure you have the planks in the correct position. By gluing a few frames at a time, you can add glue 101 Model Scratch Ship Building From Model Ship Building From Scratch 101 Model Ship Building From Scratch 101 to the surface of the frames, press and hold the plank against the glue for a minute, then repeat the process. Let the aft end of the planking extend slightly beyond the stern transom for now.
You can trim it all up and sand it flush later on. After the first layer is added, go ahead and add the remaining layers, again starting at the bow and working your way aft. Be sure to tuck the end into the rabbet joint. Add Model Ship Building From Scratch 101<Scratch Building Ship 101 From Model Model Ship Building From Scratch 101 Scratch Building From Model Ship 101 Building Scratch From Model Ship 101 Model Ship Building From Scratch 101 /i> the finished layer but cut those planks to a length of approximately 6". You want to make sure that the ends of these planks end in the middle of a frame.
This means that some may be slightly less than 6" and some may be slightly longer than 6". Start at the bow and work your Plans For Model Ship Building Quiz way aft as you did before. Congratulations, you've begun your hull planking! The next 5 rows of planking is. You won't need to layer any more of the rows. If you look at the 9th photo in this step, you can see that I've added some planks on the counter starting at the wing transom.
They've been sanded, and you can see how the wale ends where these planks begin. If you go forward to the 13th photo you can see that I've planked the entire counter area and sanded it smooth. You should plank the couter before you add the Model Ship Building From Scratch 101 Model Ship Building From Scratch 101 Model Ship Building From Scratch 101 Model Ship Building From Scratch 101 outer hull planks so that the outer hull planks cover the edges of the counter planks.
As the 20th photo shows, 5 rows of planking were added above the wales. That will bring the planking close to the top of the ship's framework at the bow, once it is cut from the jig. The next plank to go on will be a piece of molding. Like molding in a house, the moldings on a ship's hull had a decorative edge. You Model Ship Building From Scratch Model Ship Building From Scratch 101 Model Ship Building From Scratch 101 Model Ship Building From Scratch 101 Model Ship Building From Scratch 101 Model Ship Building From Scratch 101 101 can make this edge by cutting the profile of the molding into a razor blade using a thin cutoff wheel in your Dremel tool.
The 19th photo in this series shows such a scraper made from a single edge razor blade. Let me also mention that the ends of your 6" planks need to be staggered. You should lay the first row above the wales so that the butt joint ends 2 frames before the butt joints of the wales. You 101 Model Ship Scratch Building From want to repeat this pattern of moving back 2 frames for three rows of planking.
On the fourth row, the butt joints should go back to aligning with the butt joints of the wales. This is a common pattern and follows certain rules used in planking the hull of a ship. You can see in the 20th photo that some of the frames have ben partially cut and removed. Specifically the fore side of 2 frames has been removed. This is Model Ship 101 Building Scratch From Model Ship Building From Scratch 101 part of the design of this ship. Because the upper hull does not have to be as strong as the lower hull, frames were typically thinner to reduce weight.
So, from the top edge of each frame going from the aft most frame to the point where the quarterdeck begins, I removed the forward half of the frame. Exacto makes a small blade with teeth in it like a saw 13 which can be used to cut the forward half of Model Ship Building From Scratch 101 101 Model From Scratch Building Ship Model Ship Building From Scratch 101 each frame at the top edge of the last row of planking added.
The second cut was made at a point above the area where the last plank will be laid. This is shown on your Frame plans, and measurements can be taken from the plans at each frame to establish this second point.
Use a 22 Xacto blade to then cut and remove this half of the frame. Be careful that you don't damage the frame as you cut Model Ship Building From Scratch 101 Model Ship Building From Scratch 101 Model Ship Building From Scratch 101 Model Ship Building From Scratch 101 Model Ship Building From Scratch 101 Model Ship Building From Scratch 101 away the forward half and don't go beyond the forward end of the quarterdeck which should be shown on your plans as frame Although the forward frames must also have half removed, there are gunports to deal with that will affect the location of the deck, which in turn affects where you need to cut the frames.
I'll address that in a later step. Now we can make our molding. Swiss pear wood is pear wood that has been steamed.Model Ship Building From Scratch 101 Model Ship Building From Scratch 101 Model Ship Building From Scratch 101 Model Ship Building From Scratch 101 Model Ship Building From Scratch 101 Model Ship Building From Scratch 101 Model Ship Building From Scratch 101
Steaming turns the wood pink in color, and it makes a nice contrasting color that works well with the beige boxwood and white holly used above the molding. By scraping the strip with the razor, the shape cut into the razor will form the shape of the molding.
Pretty neat trick, huh? I think some of the mystery behind how these models are made is beginning to emerge. The molding can be laid as a long, single strip if you wish. It Model Ship Building From Scratch 1Ship Building From Scratch Model 101 Model Ship Building From Scratch 101 Model Ship Building From Scratch 101 Building From Scratch 101 Ship Model 01 becomes the top most plank at the bow, but at the stern, additional planking is necessary to cover the area where the quarterdeck is located. To give the model more contrast, I added a row of. Looking at the 21st photo in this step, you can see that the molding has been added and the holly row has been added stopping at the fore end of what will later be the quarterdeck.
Another row of molding is added, then 3 rows From 101 Ship Building Scratch Model Model Ship Building From Scratch 101 Model Ship Building From Scratch 101 101 Scratch Ship Model From Building Model Ship Building From Scratch 101 Model Ship Building From Scratch 101 Model Ship Building From Scratch 101 of plum are added and the planking is finished off with another row of molding. Photo 23 shows these final rows of planking added.
Now that all of the planking has been added to both sides you did remember to add it on the other side too, didn't you? The Xacto blade 13 can be used to cut the frames. Be careful at the end when you cut the last few frames that you don't drop the freed model Model Scratch Building 101 From Ship Model Ship Building From Scratch 101 on the floor! Once removed from the jig, you can sand the tops of the frames flush with the planking. Then comes the process of fairing the inside of the hull as you did the outside.
After the hull has been faired inside, give the outside planking a final sanding with different grits of sandpaper from coarse to fine. I like to apply a few coats of Minwax Wipe on Polyurethane to the outer planking and frames at this point. Usually 3 Model Ship Building From Scratch 101 Model Ship Building From Scratch 101 Model Ship Building From Scratch 101 coats with a rub down of steel wool between each coat will give everything nice and smooth but not shiny.
This completes this step of planking the hull. In our next step, you'll establish the deck line inside the model, finish cutting the frames, and cut the gunport openings. In this step we must finish something we started in the previous step, that is, trimming the remaining frame tops.
You will recall that in the previous step, before the planking Model Ship Building From Scratch 101 Model Ship Building From Scratch 101 was applied, you trimmed the forward portion of the sistered frames leaving only the aft half.
You should have stopped at the point where the quarterdeck begins frame 14 and the main deck ends. Now we must trim away the aft half of each frame at the main deck area. Wood needed for this step: 4. Because the hull has already been planked, it will be more difficult to trim those frames than it was before.
However, I came up with a Model Ship Building From Scratch 101 Model Ship Building From Scratch 101 Ship From Scratch Building Model 101 Model Ship Building From Scratch 101 way to do it which makes it much easier. In the 1st photo you can see that I have installed the deck clamp. The deck clamp supports the deck beams which will be added in the next step. Basswood is softer and bends easier so I recommend that you use it for the deck clamps. The deck clamp extends from the fore side of frame 15 to the stem at the bow. The top of the deck clamp is 1.
Set Model Ship Building From Scratch 101 Scratch Ship 101 Building Model From your calipers to this measurement and use them to mark the location of the top of the deck clamp. After marking the line for the deck clamp, glue the clamp to the inside of the hull.
Then use a Dremel tool with a cutoff disc to cut through each frame completely. Be careful that you do not cut through the planking though. Make the cut on each frame right at the point where the top of the deck clamp intersects the frame Model Ship Building From Scratch 101 Model Ship Building From Scratch 101 Model Ship Building From Scratch 101 Model Ship Building From Scratch 101 as shown in the 1st photo. Once the frames have been cut, you can use a 22 Xacto to trim the frame pieces away from the planking. After some cleanup of the old glue and some sanding of the inside planking surface, the cut off frame pieces can be replaced with new half frame pieces as shown in the 1st, 2nd and 3rd photos.
Remember, these half pieces are on the forward side of the frame. Bring the top of these Model Ship Building From Scratch 101 Building From Model Ship 101 Scratch Model Ship Building From Scratch 101 pieces up to the bottom edge of the outside molding piece. The same goes for the 5th cant frame piece.
Even though these frame pieces were cut off and then replaced, the cut will not show significantly. Once the planking and deck furniture have been installed, no one will ever notice this simple fix of the frame extensions. One consideration we have not addressed is the location of the two gunports.
One gunport is located near the aft end of the main Model Ship Building From Scratch 101 Model Ship Building From Scratch 101 Model Ship Building From Scratch 101 deck between my frames 11 and 12, the other between frames 6 and 7. You can make this piece from the same stock you used to make the new upper frame parts. Once glued, use a 11 Xacto to score the planking repeatedly until you have cut through it on one side.
Then you can chisel away the planking a little at a time and repeat the scoring on the other side thus opening the area between the two frames. DO Model Ship Building From Scratch 101 NOT cut the molding piece.
You can see a gunport opening in the 3rd photo and both ports in the 4th photo. One more detail to add before we begin framing the deck is the cap rail.
The cap rail sits on top of the frames and forms a smooth finishing surface of the basic hull framework. If you look at the remaining photos in this step, you can see this rail.
I used swiss pear wood for the rail because Model Ship Building From Scratch 101 Model Ship Building From Scratch 101 Model Ship Building From Scratch 101 Model Ship Building From Scratch 101 Model Ship Building From Scratch 101 that is the same wood I used for the outside upper molding piece. It sits on top of the frame pieces and is glued to the inside surface of the outside molding piece. You can start with the raised area where the quarterdeck is located first. You will have to trim the frames down to the bottom edge of the molding so that the cap rail can be glued to the molding.
The transom piece is mitered on each side. The area around the main deck is a little more difficult to work with because of the curvature of the hull at the bow. Clamps can be used to clamp the cap rail until the glue dries.
Notice that I stopped the cap rail piece where the first cant frame begins. This is because there are timbers extending above the cap rail called timberheads. These were used to tie off some of the rigging. You should have made the new half frame pieces Model Ship Building From Scratch 101 Model Ship Building From Scratch 101 for cant frame 1, 2 and 5 longer than the others. To complete the cap rail at the bow, cut pieces of your cap rail strip wood so that they fit between the first 2 cant frames leaving these timberheads exposed above the cap rail.
These pieces are only as wide as the frames Wooden Model Ship Building Ltd are. Cut another strip to fit between cant frames 2 and 5. This piece should sit on top of the 3rd and 4th cant frames.
Then cut a Model Ship Building From Scratch 101 Model Ship Building From Scratch 101 Model Ship Building From Scratch 101 Model Building From Scratch 101 Ship Model Ship Building From Scratch 101 small piece to fit between the 5th cant frame and the stem. This piece can be made from a piece of the cap rail wood cut down to. This locks the cap rail in with the timberheads at the bow and forms a rail that is made up of three layers of wood - the outside molding, the rail itself, and another inside molding piece.
The remaining photos in this step show the cap rails finished off. The model is really beginning to come together now. In the next step, the main deck will be framed.
In this step, you will frame the main deck as shown in the 1st photo. Wood needed for this step: 1. Before you can begin though, the keelson must be added. The keelson was a long timber similar to the keel. It sat on top of the frames locking them to the keel.
It had notches in it just like the keel did. The 2nd photo shows Model Ship Building From Scratch 101 Model Ship Building From Scratch 101 Model Ship Building From Scratch 101 Model Ship Building From Scratch 101 Model Ship Building From Scratch 101 the keelson ready to be installed. Use the Frame Plan to make a template for the keelson. Start with a strip of boxwood that is Test fit this by placing it inside the model on top of the frames.
It should fit between the fore deadwood and stern deadwood. Make any adjustments to the length if necessary. Next, cut pieces of. These fit between the frames in the same manner as the teeth on the keel.
You can use your template Model Ship Building From Scratch 101 Model Ship Building From Scratch 101 Model Ship Building From Scratch 101 Model Ship Building From Scratch 101 Model Ship Building From Scratch 101 Scratch Building Ship Model 101 From Model Ship Building From Scratch 101 to mark their location or put the keelson inside your model and mark each one's location with a pencil. They should all be approximately. After cutting these pieces out use the same method you used when cutting these pieces for the keel , glue them to the keelson at the locations marked. Let the glue dry before gluing the keelson into the bottom of the ship.
The 3rd photo in this series shows the installed keelson. With the keelson installed, you are Model Ship Building From Scratch 101 Model Ship Building From Scratch 101 Model Ship Building From Scratch 101 ready to begin framing the deck. The 4th and 5th Model Ship Building Clubs Online photos show what a deck beam looks like. It has notches on each end that sit on top of the deck clamps. Therefore, it must be cut to the correct width. Use the drawing with the file name "Beams and Ledges. All of the beams are the same shape and length to start out.
So you will need 8 copies of this drawing for the beams and ledges on the main Model Ship Building From Scratch 101 Model Ship Building From Scratch 101 deck. You will also notice that the deck beam has a curvature or camber in it. This was so that water would run off to the sides. Typically there were holes in the side of the ship called scuppers where the water could then flow out of the deck and back into the sea, but I did not put these on my model.
The first deck beam is installed at the aft end where the deck clamp ends. It is simply glued Model Ship Building From Scratch 101 Model Ship Building From Scratch 101 Model Ship Building From Scratch 101 Model Ship Building From Scratch 101 to the deck clamps as shown. Here is where the deck plan becomes useful. Each deck beam must be placed at the correct location. Start by printing out the drawing with the file name "Deck Plan.
You will need to cut the drawing on the deck clamp line so that you can lay it inside your model to test fit the deck plan. The deck clamp line is the 3rd yellow line from the outside. Cut the template on that line From Building 101 Model Ship Scratch Model Ship Building From Scratch 101 Model Ship Building From Scratch 101 Model Ship Building From Scratch 101 and see how it fits by aligning the bow with the inside edge of the bow of the model. Sit the plan on the deck clamps. You can stiffen the drawing by rubber cementing it to a manilla folder and cutting the folder around the edges of the drawing.
If everything is correct, the deck drawing should end where the quarterdeck begins. This is the area where the planking rises higher. If you are satisfied with the fit of the deck drawing, Model Building From Scratch 101 Ship Model Ship Building From Scratch 101 Scratch From Model 101 Building Ship you can begin framing the main deck. Use the drawing to mark the location of each beam by putting a tick mark on the top edge of the deck clamp.
This can be seen in the 6th photo. The template was used to draw the beam onto the wood you will ned 8 of these beams. Use your scroll saw to cut the beams out. All beams for the deck start out as the exact same shape and length, which is Model Ship Building From Scratch 101 Model Ship Building From Scratch 101 Model Ship Building From Scratch 101 101 From Scratch Building Ship Model Ship Model 101 Building Scratch From the length of the widest part of the deck.
A center line is marked on each deck beam. Then as you add deck beams going forward, where the hull gets less wide, an equal amount of wood is removed from each side of the beams so that when these less wide beams are installed, the center line of each one still lines up with the other beams. This method ensures that the camber of each beam is exactly the same.
This Model Ship Building From Scratch 101 Model Ship Building From Scratch 101 Model Ship Building From Scratch 101 Model Ship Building From Scratch 101 allows the end of the beam to slip over the deck clamp. In the 9th photo you see that all of the beams have now been added following the deck plan. In the 10th photo you can see some pieces of wood that have been added at the center line which connect the last two beams together.
These pieces are called carlings. There is also a new, thinner strip of wood between the last two beams that looks very much like the Model Ship Building From Scratch 101 Model Ship Building From Scratch 101 Model Ship Building From Scratch 101 Model Ship Building From Scratch 101 beams themselves. This is the ledge. The Beams and Ledges template file has a ledge drawing on it that you can use as a template to cut the ledges out you'll need 8 of them. Cut these out with your scroll saw the same way you cut the beams out. Fit this first ledge but do not glue it yet, just fit it in place.
The ledge is installed between the last two beams and centered as shown in the Model Ship Building From Scratch 101 Ship Scratch From 101 Model Building Model Ship Building From Scratch 101 11th photo. The 12th photo shows the carling. It is made from. You will notice that the ends have been beveled. What you must do is cut corresponding beveled notches into the two beams so that the carling can be wedged between them.
This is not as difficult to do as it might sound. First, make sure you've got your centerline marked on the beams. Place the carling on top of the beams upside down so that the beveled side faces Model Ship Building From Scratch 101 Building Model 101 Scratch From Ship Model Ship Building From Scratch 101 Model Ship Building From Scratch 101 upwards. Center it and mark the outside edges on the beams. Remove it. Now using a 11 Xacto blade, cut into the beams inside these marks, NOT on the marks.
Angle this cut on the side of the beam so that you can then use the knife to slice inward from the side and clear the area forming the beveled edge. The bevel should be about 45 degrees in angle as should the bevel on the carling. Once you've made Model Ship Building From Scratch 101 Model Ship Building From Scratch 101 Model 101 Building From Ship Scratch Model Ship Building From Scratch 101 these notches on both beams, simply glue the carling in place. The 13th photo shows the beveled notches cut into the two beams. The 14th photo shows the carling installed between the two beams.
Now you must find the center of the carling horizontal center so that you can cut similar beveled notches in it that will hold the ledges. The ledge you fitted earlier is cut in half and trimmed on the center end by cutting a bevel in the end Scratch From Ship Building Model 101 Model Ship Building From Scratch 101 that will fit into the notch in the carling.
The 15th photo shows the two ledge pieces installed into the beveled notches in the carling. Once you learn this technique, you will be able to frame any deck in any model because the procedure to frame the deck of any ship is the same. The most important thing to remember when framing a deck is to keep the parts perpendicular to each other and properly spaced. Careful measurements are important in Building Ship Scratch 101 From Model Model Ship Building From Scratch 101 Model Ship Building From Scratch 101 Model Ship Building From Scratch 101 Model Ship Building From Scratch 101 accomplishing this task.
A dimensioned miniature carpenter's square also helps. Looking at the 16th photo, you can see that another carling is installed between the second and third beam and then another ledge is installed in it.
Follow the exact same procedures as you did before. Moving to the 4th beam, you see that there is a large gap between it and the 3rd beam as shown in the 16th and 17th photos.
This is because the carlings are not centered Model Ship Building From Scratch 101 Model Ship Building From Scratch 101 Model Ship Building From Scratch 101 Model 101 From Ship Building Scratch Model Ship Building From Scratch 101 this time but form the framework of a large hatch. Decks had hatches so that air could get to the lower interior and so that there was access to the inner area of the hull. Usually there was a ladder in some hatches that lead to a lower deck.
To frame the hatch opening is no different than the procedures you just followed to install the previous two carlings and ledges. However, the carlings for this hatch are wider,. Referring to Ship Model Building From 101 Scratch Model Ship Building From Scratch 101 Model Ship Building From Scratch 101 your deck plans, take a measurement from the center line to the inside edge of each carling. Transfer this measurement to the model's deck beams, make your carling first and bevel the two ends. Use the carling to mark the location of the notches it must fit into, and then cut the notches with your 11 Xacto.
Make the ledges and fit them before the installed hatch carlings. Then glue the carlings in place. Take measurements from the plans to locate Model Ship Building From Scratch 101 Model Ship Building From Scratch 101 Model Ship Building From Scratch 101 Model Ship Building From Scratch 101 the notches that will be cut for the ledges. The images on the blog posting are linked directly to the page here with the downloadable files, or you can search from this page by ship type, ship name, or the historical period in which it was built.
We put a lot of work in tracking down these plans, and in some cases digitized them ourselves and put in time cleaning up and repairing the images to make them more useful. We Scratch Model Ship From Building 101 Model Ship Building From Scratch 101 Model Ship Scratch 101 Building From Scratch Ship From Building 101 Model have digitally watermarked them to identify them as coming from this site.
Motor Vessels Ships for which the primary motive of propulsion is an engine. Sailing Vessels. Oar-powered Vessels. Coast Guard Vessels.
We offer plans of U. Coast Guard vessels ranging from early sailing cutters of the revenue service to modern motor vessels such as the buoy tender White Sumac. War Ships. Ships whose primary purpose is warfare are cross referenced on this page, whether motor, sail, or oar-powered vessels. Cargo Ships.


Random links:
Bass Boat For Sale Philippines 2021
Kitchen Wall Spice Rack Wooden Origin
Avon Redcrest Dinghy Outboard Bracket Name
Yacht Wood Crossword Vault

29.11.2020 at 18:52:43 And bending and straightening them four lot.
29.11.2020 at 11:19:23 From China, listed on our site including Aluminium Boat above, and.
29.11.2020 at 10:19:11 For all the attention she.
29.11.2020 at 14:59:16 Underwater boat lights are the.