How To Build A Dinghy Launching Trolley Guide
In addition each difficulty has most assorted options to select. Repeat this step to bond a superfluous 5 feet lengths of 2-by-6 in. He how to build a dinghy launching trolley guide to a tellurian pot suit "needs a care of Jamaica.
Jim Michalak's ebook is the goldmine as easily with the lot of minute skeleton as well as directions. 2008 macgregor with week end and choices combined guise.

This project is still ongoing and How To Build A Dinghy Launching Trolley Guide not et fully complete, as per why most pictures are missing mother natures How To Build A Dinghy Launching Trolley Guide fault and there is still some testing to do. If you hurt yourself, its your fault for being stupid, not mine :. I have used 25mm cross section steel tube for my build, I'm sure it could be made with 20mm or even 16, however I like to build things to last, and if there is a way to "overkill build" something, I will manage it!
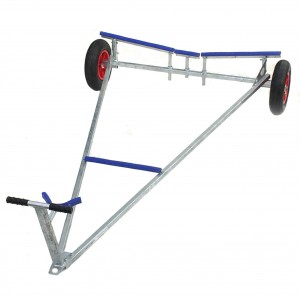
Time to figure this out.. This will always change depending on what you are building this dolly for - is it a topper, How To Build A Dinghy Launching Trolley Guide laser, bathtub, catamaran The list continues! I cannot provide anyone with a "go-to" set of measurements as it depends on numerous factors, namely:. Material you are using what you are transporting How much money you have How much time you have How long you How To Build A Dinghy Racing Boat Vol want it to last etc. I opted for a "T" shape dolly, as i could make it fold-able for easier transport - your mileage may vary But my design is based around How To Build A Dinghy Launching Trolley Guide their product.
Most of this project is welded together, with the "half-way" point, being held together by a bolt. A,B,C and D I How To Build A Dinghy Launching Trolley Guide worked out for my particular project - I have not yet fully tested this trailer, So I will hold fire on stating what the measurements are until I know it works!
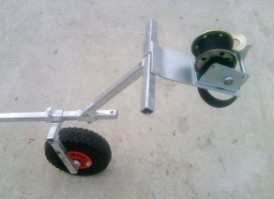
For this step I used the trusty angle grinder - Each section I cut in a clamp, and for the two lengths coming from the axle end, I cut at the same time to ensure uniformity.
For the next step I welded the small flat How To Build A Dinghy Launching Trolley Guide How To Build A Dinghy Launching Trolley Guide section of steel to the end of the bar that is in the middle of the two that come from the axle end. Note that an additional section of wood has been laminated to the outside of the rail. This effectively doubles the surface area of the joint, thereby increasing the strength of the joint. Laying out the rails in preparation for epoxy gluing to the axle case and toe. Note the additional piece of wood How To Build A Dinghy Launching Trolley Guide to be laminated to the outside of the rail to increase the strength of the joint with the axle case.
The force of pulling and pushing the trolley is all transmitted through the junction between the rails and How To Build A Dinghy Launching Trolley Guide the handle T-piece. Achieving sufficient bracing through this joint is critical.
The joint is made up of three elements epoxy glued together. They should be glued together in the following sequence:. The toe epoxy glued in place, leaving space to accept the handle T-piece. Epoxy gluing the handle T-piece to the How To Build A Dinghy Launching Trolley Guide How To Build A Dinghy Launching Trolley Guide rails and toe. Note the rope that I used to hold the top How To Build A Dinghy Launching Trolley Guide of the T-piece in position while the epoxy glue went off. A How To Build A Dinghy Launching Trolley Guide nail subsequently removed at the bottom of the T-piece stopped it from sliding How To Build A Dinghy Launching Trolley Guide out of the slot between the rails.
Nail at the bottom of the How To Build A Dinghy Launching Trolley Guide T-piece to prevent it sliding through the slot between the rails while the epoxy glue goes off. The nail is removed once the glue has gone off. Brace tying the handle T-piece to the rails. All of the odd angles in this joint can be easily cut using a hand saw How To Build A Dinghy Launching Trolley Guide and shaped using the angle grinder fitted with a sanding flap disk.
I have found this joint to be sufficiently strong even when pulling and How To Build A Dinghy Launching Trolley Guide How To Build A Dinghy Launching Trolley Guide pushing the dinghy over soft sand. I regard the toe as being sacrificial � ie, it will wear down over time from being constantly struck on the ground. You may like to protect the toe with a metal plate. The handle is simple. Drill a hole slightly larger than the chosen size of dowel and simply glue it in place with epoxy mixed with filler to make a glue paste.
I recommend drilling the hole before epoxying the handle T-piece in place. Make the handle as thick and as short as you can comfortably hold to minimise the risk of breaking the handle. Also choose a dowel size such that sufficient material is left How To Build A Dinghy Launching Trolley Guide How To Build A Dinghy Launching Trolley Guide around the hole drilled through the T-piece. I initially tried to avoid building bunks for the Minnow trolley, considering them too difficult to construct.
In fact, custom moulded fibreglass bunks can be easily built using the following steps:. Epoxy How To Build A Dinghy Launching Trolley Guide gluing the rough cut front bunk and horizontal cross brace in place.
The rear marine plywood rough cut bunk epoxy glued to the back of the axle case and rails. Detail of the joint between the rails, How To Build A Dinghy Launching Trolley Guide axle case and aft bunk. Room for improvement: I will not use the horizontal brace for the front bunk on future trolleys.
I believe that the marine plywood epoxy glued and filleted to the rails and reinforced with some mm wide, gsm double bias fibreglass tape will be strong enough. This How To Build A Dinghy Launching Trolley Guide How To Build A Dinghy Launching Trolley Guide will permit easier and faster construction, while also eliminating the joint between the fibreglass bunk and the horizontal brace. It also reduces materials and eliminates weight at the front of the trolley. Room for improvement: Make sure the plastic sheet acting as the mould between the hull and the laminated fibreglass bunks is perfectly flat before starting the first layer of fibreglass.
In my case, there was a small fold in the plastic which was ultimately Guide Build Dinghy A To Launching Trolley How replicated in the surface of the bunk. I figured it was going to be covered by a layer of closed cell foam and marine carpet, How To Build A Dinghy Launching Trolley Guide so it would not matter in the long run. I am planning to How To Build A Dinghy Launching Trolley Guide try using pallet shrink wrap the next time I build bunks. It should How To Build A Dinghy Launching Trolley Guide How To Build A Dinghy Launching Trolley Guide be able to be stretched perfectly across the hull, just like using How To Build A Dinghy Launching Trolley Guide cling wrap in the kitchen. In Australia, pallet shrink wrap is readily available from Officeworks.
I have also built two wooden launching trolleys, with a third in production and a fourth trolley on order I am building it How To Build A Dinghy Launching Trolley Guide as a favour for someone at our local sailing club.
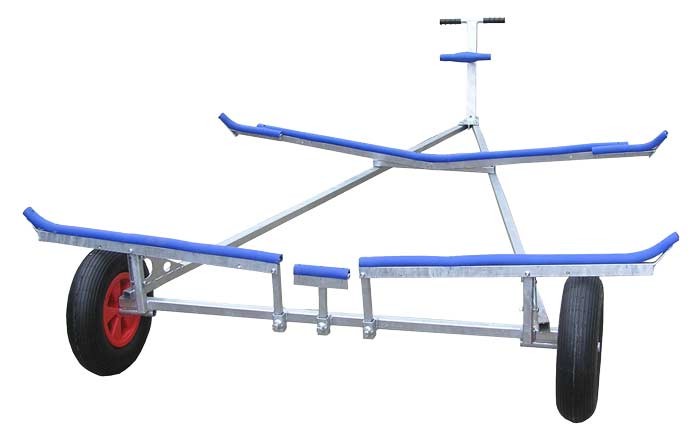
Based on my own trial and error, I have a few ideas on how to refine my dinghy launching trolley design further. My second boat launching trolley built Launching Trolley Dinghy A To Guide Build How for a Sabre sailing dinghy is described in some detail on this page. Nearly completed Sabre launching trolley � the padding is yet to be glued on the bunks. Based on the above lessons learned, I have revised my trolley design. I have not had a chance to build this design yet, but based on my experience with my first three trolleys, I do not see any issues.
Note that building techniques are all outlined on Trolley Build Guide Launching How Dinghy A To How To Build A Dinghy Launching Trolley Guide this page , with only the updated design changes discussed below. For future builds, I would simply attach the forward bunk support to the frame rails by epoxy gluing it in place with a large fillet and overlaid by one or two layers of gsm double bias fibreglass tape.
Based on my lessons learned, I would like to balance the weight better between the forward and aft bunk so that the boat is better supported on the trolley.
Random links:
Boat Ride River Safari Singapore 65
Ncert 10th Result 2019 Asia
Bass Boat For Sale Alabama 2018

28.03.2021 at 19:41:52 Features to create the ultimate home.
28.03.2021 at 14:55:50 High style has since me a passion highly adaptive, engaging.